“Capturing a model’s attitude takes concentration. Study your model, looking for unique variations. Always approach a model as if you’ve never seen a person before.” Charles Reid’s Watercolor Secrets
Painting in natural light
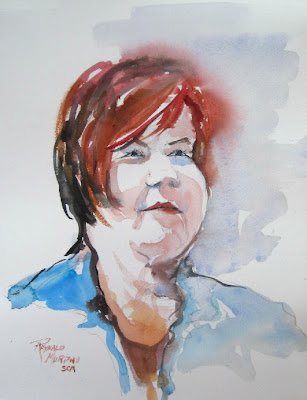
During the fall and winter months I paint portraits indoors lit by artificial light. This is the traditional way most portraits are done. However, at an outdoor workshop at Domaine Saint-Bernard, Tremblant in August I painted some watercolor portraits by natural sunlight. I found the advantages of models lit by sunshine outweighed the inconveniences.
Sunlit figures
The model sat facing me. Strong sunlight draped the figure from to left to right at a diagonal. Throughout the afternoon the light remained relatively constant. What I especially enjoyed were the forms defined by the crisp shadows cast across the facial features. These forms described beautifully the particularities of the model.
I drew the figure with a 2B pencil on 10 by 13 inch sheets of Strathmore Aquarius II and Arches CP watercolor paper. I started by drawing the eyes. I tried to capture the shape of the eye correctly, to locate the iris precisely, to draw the shape of the eyebrow well and to find the correct spacing between the eyes. Using the inner edge of the eye shape as a reference point I located the limits of the wings of the nose. I also drew the shape of the nostrils. I then drew the line formed by the upper and lower lip paying particular attention to its slant and its limit. The contour of one side of the face, the length and width of the neck and the hair shape were drawn next. I defined these areas with color later. After ten minutes spent on the drawing the model relaxed while I prepared my colors.
Painting – first stage – linear definition
Using two Kolinsky natural hair watercolor brushes and a limited palette I painted the three stages in one go as much as possible. It was important that I get the value right the first time since I tried not to go back over an area with paint except in the hair and clothing area. Using a combination of Ultramarine Blue and Burnt Sienna I first painted the irises, then the linear shapes of the upper and lower eyelids. I fused all these shapes together wet on dry. Next, I outlined the limits of the nose with the same mixture, painted the nostrils, painted the mouth line and finally contoured the facial form particular to the sitter. All this was done with extreme concentration since I did not intend to correct or alter any of these marks.
Second stage – painting the shapes
Most of the areas just painted were partially wet. I painted all of the shadow shapes in one go. Depending on the skin tone of the sitter I used a warm mixture of Burnt Sienna combined with either Raw Sienna, Transparent Yellow or Alizarin Crimson. These washes fused slightly with the areas painted in the first stage.
The final stage – hair, clothing and background
To achieve the feeling that the hair was not just added on, I rewet part of the skin tone near the hair line with clean water. Then I dropped in the color representing the hair color. It fused slightly with the surrounding skin tones. The clothing and background were painted with bolder suggestive brush strokes. Finally, using lamp black or Payne’s Grey I strengthened values where needed.
Suggestion is the key
My goal in painting these impressionistic portraits was not to render a photo likeness of the sitter but rather to try to suggest with paint what the sitter communicated to me. Before putting pencil to paper I observed intensely the sitter for a few minutes. I mentally chose those features; shapes or colors which I felt best described the character of the sitter. These key elements were my focus throughout the session.
The ultimate challenge
Portrait painting is particularly demanding since it tests one’s drawing skills if one is to arrive at a likeness to the sitter. Painting portraits in watercolor, an unforgiving medium with little room for correction, ups the ante to the maximum. I find this challenge akin to performing on stage where there is no room for error, but oh, what an adrenaline rush!
Raynald Murphy sca


